Your home could be your new office. How well are you setup for your new office?
You may have it setup for an hour or two of work here and there, but what about 8-10 hours a day, 5 days a week?
It might be ok for now. After a few weeks, you’ll start to know if your going to lose focus, concentration and cause yourself long term pain from an inadequate home office setup.
Regardless of the setup you have at home, this handy little 3 step process could make all the difference.
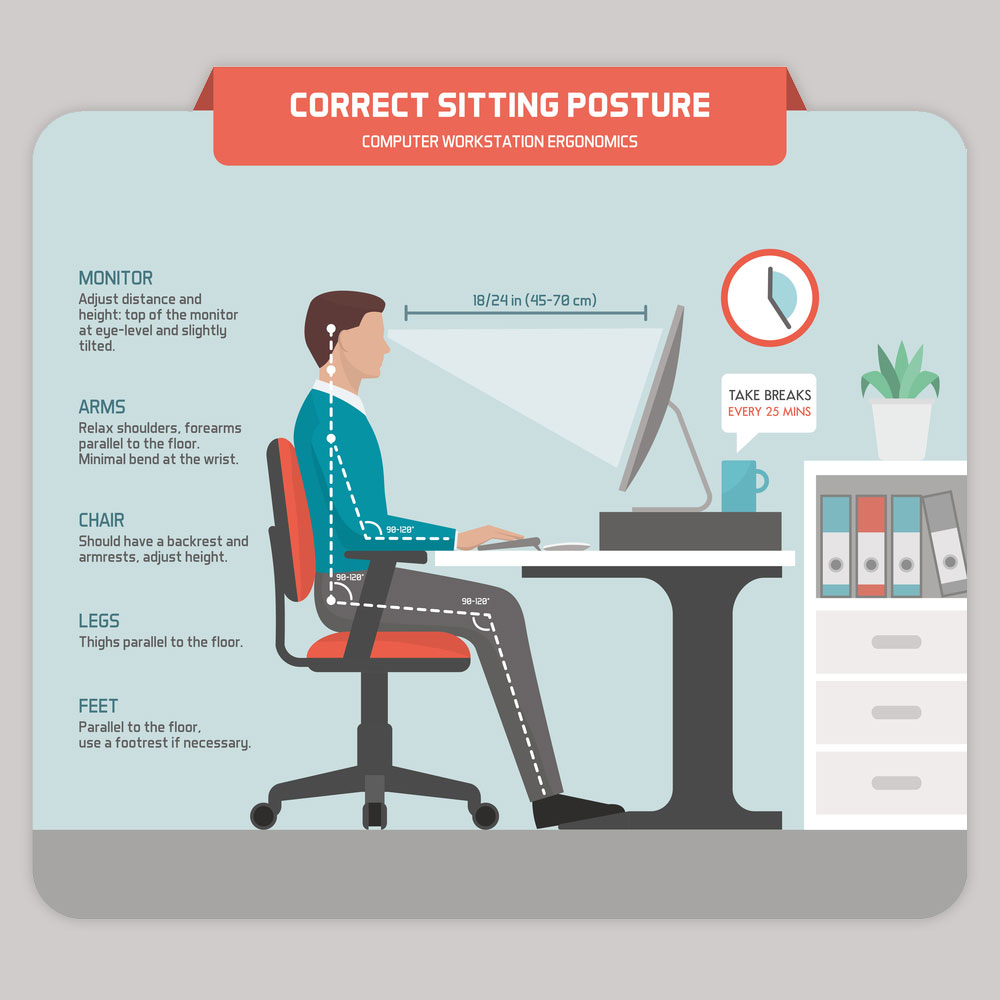
How to sit at your computer for the day? Three step adjustment
Step 1: Your chair
- Push your hips as far back as they can go in the chair
- Adjust the seat height so your feet are flat on the floor and your knees are equal to, or slightly lower than, your hips.
- Adjust the back of the chair to a 100 – 110 degree reclined angle. Make sure your upper and lower back are supported. Use inflatable cushions or small pillow if necessary. If you have an active back mechanism on your chair, use it or make frequent position changes.
- Adjust the armrests (if fitted) so that your shoulders are relaxed.
Step 2: Your keyboard
- Pull up close to your keyboard
- Position the keyboard directly in front of your body
- Determine what section of the keyboard you use most frequently. Readjust the keyboard so that section is centred with your body.
- Adjust the keyboard height so that your shoulders are relaxed, your elbows are in a slightly open position (100 – 110 degrees), and your wrists and hands are straight.
- The tilt of your keyboard is dependent upon your sitting position. Use the keyboard tray mechanism or keyboard feet to adjust the tilt. If you sit in a forward or upright position, try tilting your keyboard away from you at a negative angle. If you are reclined , a slight positive titl will help maintain a straight wrist position.
- Wristrests can help to maintain neutral postures and pad hard surfaces. However, the wristrest should only be used to rest the palms of the hands between keystrokes. Resting on the wristrest while typing is not recommended. Avoid using excessively wide wristrests, or writstrests that are higher than the spacebar of your keyboard.
- Place the pointer as close to the keyboard as possible to the keyboard.
Step 3: Monitor, document and telephone
- Adjust the monitor (or documents) so that your neck is in a neutral, relaxed position.
- Centre the monitor directly in front of you, above your keyboard.
- Position the top of the monitor approximately 2-3″ above seated eye level.
- Sit at least an arm’s length away from the screen and then adjust the distance of your vision.
- Reduce glare by careful positioning of the screen(s).
- Place the screen at right angles to windows if possible.
- Adjust the curtains or blinds as needed.
- Adjust the vertical screen angle and screen controls to minimise glare from overhead lights.
- Place your telephone within easy reach. Use a headset (corded or cordless) if possible to avoid cradling the handset.
Bonus Step 4: Move around or get up and move.
- Moving around for only a couple of minutes can reduce fatigue
- Don’t let any part of your body go for long without moving it around.
- Adjusting your eyesight by looking into the distance frequently can help reduce eye strain and headaches.
Improve productivity just a little bit by reducing headaches, migraines, eyestrain, tight muscles; improving focus and concentration you can drastically improve the results of your business.
Think of it this way; If you can improve productivity in any one of the areas above by just 1 minute per hour in a workforce of 10; then you can claim back 36 days per year!
[220 days x 8 hours x 1 minute x 10 people will give you 36 days of additional upside]
Stay productive, healthy and safe!